 Bingung dengan apa yang anda lakukan setelah instal atau upgrade ubuntu anda dari 11.04 ke 11.10, saya punya beberapa masukan yang mungkin bisa menjadi inspiras.
Berikut ini beberapa hal yang mungkin dilakukan
arikel ini bersumber dari
things-to-tweak-after-installing-ubuntu.html
In Ubuntu 11.10 Oneiric Ocelot you can
only switch between the default GTK themes by default. Also, there's no
built-in GUI to easily change fonts or icon themes. But you can do this
using GNOME Tweak Tool:
sudo apt-get install gnome-tweak-tool
Once installed, GNOME Tweak Tool
should show up as "Advanced Settings" in the menu. Besides changing
fonts or themes, GNOME Tweak Tool can also be used to enable/disable
GNOME Shell extensions, tweak the desktop, various windows behavior or
GNOME Shell.
No screensaver in GNOME 3.2

GNOME 3 doesn't have a screensaver,
just a black screen. If you want to use a screensaver, you can use
Xscreensaver - install it using the following commands (this will also
remove gnome-screensaver):
sudo apt-get remove gnome-screensaver
sudo apt-get install xscreensaver xscreensaver-gl-extra xscreensaver-data-extra
Then search for "Screensaver" in the menu and tweak its settings to your needs.
To add Xscreensaver to startup, open Startup Applications and add "xscreensaver -nosplash".
Let's also make the lock screen work (CTRL + ALT + L):
sudo ln -s /usr/bin/xscreensaver-command /usr/bin/gnome-screensaver-commandTo be able to watch a movie properly, also install Caffeine:
sudo add-apt-repository ppa:caffeine-developers/ppa
sudo apt-get update
sudo apt-get install caffeine python-glade2
To revert the changes (go back to the black GNOME Screensaver screen):
sudo apt-get remove xscreensaver xscreensaver-gl-extra xscreensaver-data-extra
sudo rm /usr/bin/gnome-screensaver-command
sudo apt-get install gnome-screensaver
Nautilus search
Partially fix annoying Nautilus behavior that doesn't let you properly search by typing when there are a lot of files/folders: in Nautilus, select View > Statusbar.
Install Syanptic

Synaptic is not installed by default
in Ubuntu 11.10 and while Ubuntu Software Center got many new features,
it still can't do everything Synaptic can. Install Synaptic back using
the following command:
sudo apt-get install synapticDisable Overlay Scrollbars

If you don't like the overlay scrollbars, you can remove them using the following command:
sudo apt-get remove overlay-scrollbar liboverlay-scrollbar3-0.2-0 liboverlay-scrollbar-0.2-0To revert this change, install the packages back:
sudo apt-get install overlay-scrollbar liboverlay-scrollbar3-0.2-0 liboverlay-scrollbar-0.2-0Missing features: web apps and file previewer
Two missing GNOME 3.2 features in
Ubuntu 11.10 Oneiric Ocelot (for both Unity and GNOME Shell) are the web
applications and Sushi quick previewer.

The first requires Epiphany 3.2.0 which is available in the WebUpd8 GNOME 3 PPA:
sudo add-apt-repository ppa:webupd8team/gnome3
sudo apt-get update
sudo apt-get install epiphany-browser
And the second - Sushi file previewer -, is available in the official Ubuntu repositories:
sudo apt-get install gnome-sushiLonger battery life

I don't know if the kernel power bug
is real or not, but many users have reported that using Jupiter or a
tweak we've posted a while back, their laptop/netbook battery life
increased. Install Jupiter using the following commands:
sudo add-apt-repository ppa:webupd8team/jupiter
sudo apt-get update
sudo apt-get install jupiter
If you have an EeePC, also install the following package for SHE support:
sudo apt-get install jupiter-support-eeeAs for the other tweak, see this post: Linux Kernel Power Issue / Overheat Workaround.
No more Sun/Oracle Java
The "sun-java6" package is no longer
available in the official Ubuntu 11.10 Oneiric Ocelot repositories due
to the removal of the JDL license. Java 7 won't be in Oneiric either,
but you still have 3 options:
- Install OpenJDK:
sudo apt-get install openjdk-7-jre- Or Oracle (previously Sun) Java 6 from the LFFL PPA:
sudo add-apt-repository ppa:ferramroberto/java
sudo apt-get update
sudo apt-get install sun-java6-jdk sun-java6-plugin
- Or manually install Java 7 (JDK) in Ubuntu 11.10 Oneiric Ocelot.
Fix for Nautilus crashing on start
If Nautilus crashes, chances are this is because of the "nautilus-open-terminal" package, so remove it:
sudo apt-get remove nautilus-open-terminalThen restart Nautilus:
nautilus -qAutostart items

Some applications/services that used
to be in the Startup Applications dialog are no longer there. That's
because they are hidden now but you can still find them under /etc/xdg/autostart
. So if you want to remove the startup sound or other hidden
applications from starting automatically, remove their .desktop files
from /etc/xdg/autostart (you'll have to run Nautilus as root:
"gksu nautilus"). But make sure you make a backup of the files you want
to remove firstly!
GNOME Shell tweaks
Fix ALT + F2

ALT + F2 doesn't work by default in GNOME Shell under Ubuntu 11.10 Oneiric Ocelot. To fix it, open "System Settings" and under Keyboard > Shortcuts > System,
click "Disabled" next to "Show the run command prompt" and press ALT +
F2 - this should set ALT + F2 for running the command prompt.
Easily change GNOME Shell themes
To be able to easily change the GNOME
Shell theme, besides GNOME Tweak Tool you'll also need the User Theme
extension, available in the WebUpd8 GNOME3 PPA:
sudo add-apt-repository ppa:webupd8team/gnome3
sudo apt-get update
sudo apt-get install gnome-shell-extensions-user-theme
Then use GNOME Tweak Tool to activate the theme.
For more extensions, see: Official GNOME Shell Extensions Available In The WebUpd8 GNOME 3 PPA For Ubuntu 11.10.
Move icons from Message tray (bottom tray) to the Top Bar
Some might find the notification area
icons showing up in the Message Tray (at the bottom of the screen,
hidden by default) annoying or confusing. But you can move the icon on
the Top Bar using an extension:
sudo apt-get install git-core
cd
git clone https://github.com/rcmorano/gnome-shell-gnome2-notifications.git
sudo cp -r gnome-shell-gnome2-notifications/gnome-shell-gnome2-notifications@emergya.com /usr/share/gnome-shell/extensions/
Then press ALT + F2 and enter "r" to restart GNOME Shell.
Important: this extension shows up
as disabled in GNOME Tweak Tool because of an error in the extension
code. Despite this, the extension still works!
No shutdown menu entry

By default, there's no shutdown entry
in the status menu and you must press and hold ALT to be able to
shutdown your computer when using GNOME Shell. But this can be changed
by installing Alternative Status Menu extension which adds "Power off"
and "Hibernate" to the status menu, visible at all time (and not just
when pressing the ALT key). Install it:
sudo add-apt-repository ppa:webupd8team/gnome3
sudo apt-get update
sudo apt-get install gnome-shell-extensions-alternative-status-menu
Then use GNOME Tweak Tool to enable the extension.
Fix Nautilus menu being displayed under the GNOME Shell top bar when using transparent GNOME Shell themes

If you use a transparent GNOME Shell
theme such as Zukitwo, the Nautilus menu shows up behind the top bar.
You can fix this either by removing global menu (see below, under "Unity
tweaks") or by disabling Nautilus from handling the desktop using GNOME
Tweak Tool (under "Desktop", set "Have file manager handle the desktop"
to off):

Disabling Nautilus from handling the
desktop means you won't have any icons on the desktop anymore. If this
is a big deal to you, remove AppMenu (Global Menu) - but you won't have a
global menu in Unity anymore (though that shouldn't be a big issue if
you don't use Unity anyway).
To install GNOME Tweak Tool, see the first tweak in this post.
To install GNOME Tweak Tool, see the first tweak in this post.
Automatic login to GNOME Shell instead of Unity
If you enable autologin, your computer
will automatically login to Unity. But there is a way to get Ubuntu
11.10 Oneiric Ocelot to automatically login to GNOME Shell.
Firstly, enable Automatic Login: in System Settings go to "User Accounts", then click "Unlock", enter your password and click the button next to "Automatic Login". That will make Ubuntu automatically login to Unity. Let's make it automatically login to GNOME Shell instead:
Firstly, enable Automatic Login: in System Settings go to "User Accounts", then click "Unlock", enter your password and click the button next to "Automatic Login". That will make Ubuntu automatically login to Unity. Let's make it automatically login to GNOME Shell instead:
sudo /usr/lib/lightdm/lightdm-set-defaults -s gnome-shellUnity tweaks
Configure Unity (autohide, etc.)

Unity 3D can be configured through CompizConfig Settings Manager, but CCSM isn't installed by default so let's install it:
sudo apt-get install compizconfig-settings-manager
Using CCSM you can configure the Unity
Launcher reavel mode and timeout, the Unity Launcher autohide
(autohide, dodge windows, dodge active windows or disable autohide),
various keyboard shortcuts, the new ALT + TAB switcher behavior,
blacklight mode, panel and launcher opacity, launcher icon size and
more.
A few quick stuff I for one always tweak using CCSM (open CompizConfig Settings Manager and click the "Ubuntu Unity Plugin"):
To disable launcher autohide: on the "Behavior tab" under "Hide Launcher", select "Never".
To disable mounted devices from showing up on the Unity Launcher: on the "Experimental" tab, under "Show Devices" select "Never".
By default, applications that usually take 75% of the screen are maximized automatically on start. To change this automaximize value, on the "Experimental" tab, look for "Automaximize value" - tweak this to whatever value you want.
Configure Unity 2D

Some Unity 2D settings as well as other tweaks can be performed using "dconf-editor", part of the "dconf-tools" package. Install it using the following command:
sudo apt-get install dconf-toolsThen press ALT + F2 and enter: "dconf-editor" to launch it. You can find the Unity 2D settings under com > canonical > unity-2d.
Re-enable the systray (notification area)

You no longer need to whitelist Qt
applications but you may still need the systray for other applications
such as Shutter, Jupiter, etc. You can whitelist the systray using the
following command:
gsettings set com.canonical.Unity.Panel systray-whitelist "['all']"Then log out and log back in.
Disable Global Menu (AppMenu)

Don't like the global menu? Get the menu back in the application window instead of using a global menu on the top panel:
sudo apt-get remove appmenu-gtk3 appmenu-gtk appmenu-qtThen, restart your computer (performing a logout only may not be enough).
You can also disable the global menu without removing any package. See HERE.
To revert the changes, install these packages back:
sudo apt-get install appmenu-gtk3 appmenu-gtk appmenu-qtAnd restart your computer.
Use a global menu for LibreOffice

By default, LibreOffice doesn't come with a Global Menu but you can manually install it:
sudo apt-get install lo-menubarIf you experience any issues with it, simply remove it:
sudo apt-get remove lo-menubarDisable the user switcher indicator

The user switcher indicator (or
Me-User-Indicator or whatever is called) can be useful if multiple users
log in on your computer but if it's just one user, you can get more
space by disabling it. Presuming you've already installed the
"dconf-tools" package: press ALT + F2 or open a terminal and enter:
dconf-editor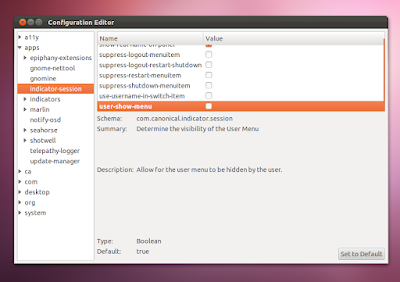
Then navigate to apps > indicator-session
and uncheck the box next to "user-show-menu", then restat Unity (ALT +
F2 and enter "unity --replace") or log out and log back in.
Something went wrong! How do I reset Unity or Compiz?
You can easily reset Unity or Compiz using the following commands (be careful when using these commands and only use them if you really have to!):
- to reset the Unity launcher icons:
unity --reset-icons- to reset Unity:
unity --reset- to reset Compiz:
gconftool-2 --recursive-unset /apps/compiz-1
unity --reset
Using a different "shell"
By default, Ubuntu 11.10 Oneiric
Ocelot uses Unity 3D (with Compiz). If you don't like it, you can try a
different interface, while still using GNOME:
 |
| Unity 2D |
Unity 2D is installed by default and
is used as the fall-back mode for computers that can't run Unity 3D. To
use Unity 2D, log out and select "Ubuntu 2D" in the login screen:

 |
| GNOME Shell |
GNOME Shell is not installed by default but you can easily install it from the official Ubuntu repositories:
sudo apt-get install gnome-shellOnce installed, log out and select "GNOME" from the login screen:

 |
| Classic GNOME 3 session |
You can also use the GNOME 3 classic session. Install it using the following command:
sudo apt-get install gnome-session-fallbackAnd select "GNOME Classic" from the login screen:

I'll continue to update this post with more tweaks so keep an eye on it. If you've found some annoyance in Ubuntu 11.10 Oneiric Ocelot and know a fix / tweak for it, let us know in the comments! For more tweaks, also take a look at our previous post: Things To Tweak / Fix After Installing Ubuntu 11.04 Natty Narwhal.


0 komentar:
Post a Comment