This tutorial shows how to dual-boot Linux Mint 17 and Windows 8 on a PC with UEFI firmware. The computer used for the test installation is not an OEM one. Rather, it is a custom-built computer, with an ASRock motherboard and Intel Core i3 processor.
However, if you follow this guide step-by-step, you should be able to use it to dual-boot Linux Mint 17 and Windows 8 on any computer with UEFI firmware on a single hard drive.
Note that this applies to the Linux Mint 17 Cinnamon or MATE editions, not the KDE edition, which uses a slightly different graphical installer. And note also that this guide may also be used to dual-boot Linux Mint 17 and Windows 7 on a computer with UEFI firmware.
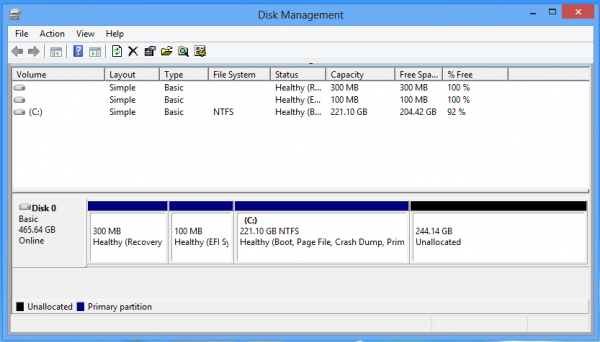
Step 1. Shrink Windows 8’s C Drive: Shown in the screenshot below are the existing partitions on the target hard drive after enough space to install Linux Mint 17 had been recovered. If you don’t know how to shrink a Windows partition, see How to resize or shrink a partition or the C drive in Windows 7. The target hard drive used for this tutorial is 500 GB in size, with about half of that recovered for installing Linux Mint 17.
Step 2. Install Linux Mint 17: After Step 1 has been completed, time to install Linux Mint 17. Reboot the computer with the installation media you created in the optical drive or in a USB port. It will boot into the Live desktop. From there, launch the installer by clicking on its icon on the desktop. When the installer starts, click until you get to the step shown in this screenshot. ThisInstallation type step shows available partitioning methods. It will likely inform you that “This computer currently has no detected operating systems. What would you like to do?” Select the Something else option, then click Continue.

That should open the installer’s Advanced Partitioning Tool‘s window. You should see all the partitions on the system, including the space that was recovered from Windows 8. That space should be marked as “free space.” Make a note of the partition marked as type efi. That takes the place of the traditional /boot partition. It will come into play at the end of this step.
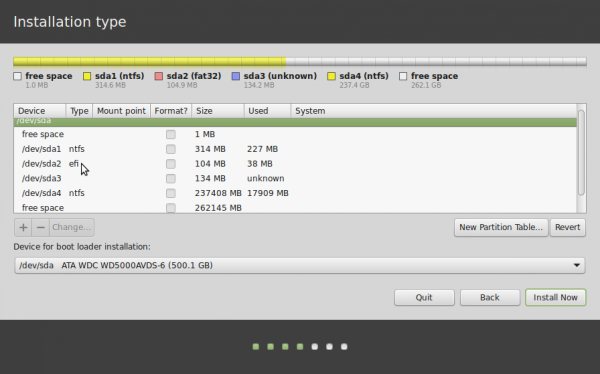
To start creating partitions, select the free space, then click on the + button directly below it.

That should open the installer’s partition editor. If you are new to the concept of disk partitions in Linux and creating partitions in Linux Mint 17, it is highly recommended that you read Guide to disks and disk partitions in Linux. For each partition that you’ll create at this step, all you need to modify are the values for “Size,” “Use as” and “Mount point.” And because a few of the partitions needed were already created during the installation of Windows 8, only partitions for / (root), /home and Swap will need to be created for Linux Mint 17 – in that order.
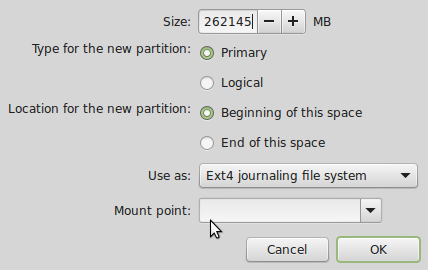
For the root partition, a disk space of 20 GB (20,000 MB) should be more than enough. The recommended minimum for installing Linux Mint 17 is 8.1 GB, so the extra should take care of future growth in disk usage. For file system (Use as), you may select the default (Ext4). Be sure to select / from the “Mount point” menu. OK.

For the /home partition, assign the disk space you think you need and select /home for the mount point. OK.

For the Swap partition, a size of 4 GB (4000 MB) should be enough. From the “Use as” menu, select swap area. OK.

Back to the main partitioning window, you should see all the newly created partitions. Did you notice that we did not create a boot partition? That’s because on these systems, the EFI partition, which on the system used for this tutorial is /dev/sda2, serves as the boot partition. Boot files for GRUB will be installed there. GRUB (the GRand Unified Bootloader) is the boot program used by Linux Mint and virtually all Linux distributions. Before clicking Install Now, change the entry in the “Device for boot loader installation” from /dev/sda to /dev/sda2.

The menu should look like this. Continue with the rest of the installation.

Step 3. Set the Default Boot Manager: After Step 2 has completed successfully, reboot the computer. Before it reboots into the default boot device, press the F key that will take you to the boot menu. For my computer, it is the F11 key. This screenshot shows the entries in the boot menu of the computer used for this tutorial. The AHCI P2: WDC WD5000…entry is for the hard drive used for this installation. The OS entry for Windows 8 is Windows Boot Manager. Somehow, that of Linux Mint 17 isUbuntu. If you select the AHCI P2: WDC WD5000… entry, the computer will not boot. To boot into Linux Mint or Windows 8, select the matching OS entry.

This very bad image, taken with a digital camera, shows the GRUB menu of Linux Mint 17. From there, you can boot into the newly installed OS or Windows 8. Once you’re satisfied that all works as intended, you may then make the entry for Linux Mint 17 the default boot device in the computer’s UEFI setup utility.

Original Post From : http://linuxbsdos.com/


0 komentar:
Post a Comment